Media Controller?
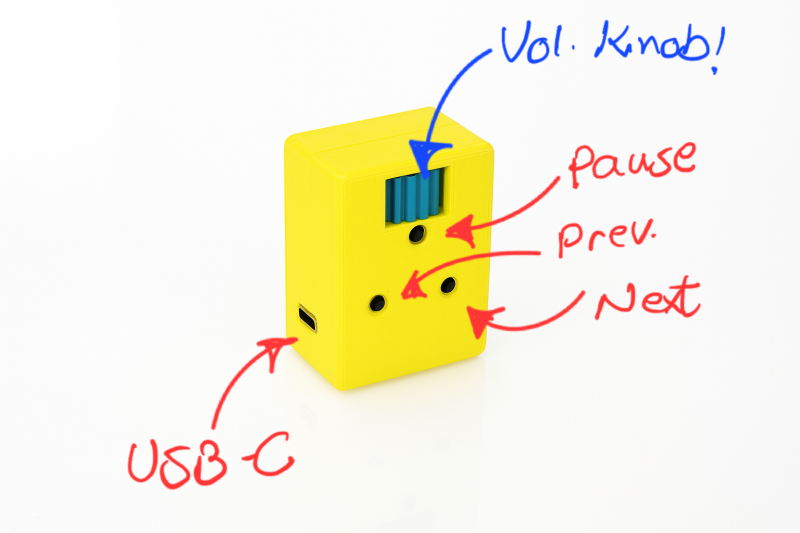
Yes friends, a media controller, a wired one. This one has a story. I own a Hyundai Tucson 2017 that I use to get to my work place. It had an old Navigation system that I could not connect it to my android phone and it could not use google maps or wayz so I looked over the internet and bought a very good android navigation system and installed it easily, but the problem came up that the media controllers on the steering wheel do not function anymore. I purchased a small media controller that uses bluetooth but unfortunatelly the buttons do not function as they supposed to work. The idea came to my mind to make a small wired media controller to control media while I am drivign without touching the screen. This is a very small media controller that could be connected to any device using usb c connection.
Lets get to make it. First a list on requirements:
- Arduino pro micro (ATMEGA32U4)
- Covered cupper wires
- Micro tacktile push buttons
- Potentiometer (10K)
- M2x6 Screws (or glue)
- Soldering iron
- USB C cable
- Arduino IDE software
- 3D printer
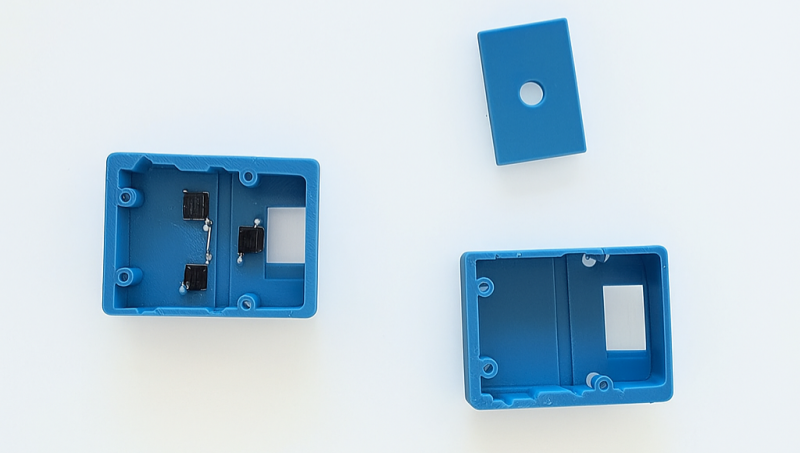
Now first we are going to download and print the 3mf files from the link at the end of this section. After printing we would have the three parts shown in the picture, a back cover, a front cover, a potentiometer holder tray and a potentiometer knob which is not shown in the picture.
In this stage we put the micro push buttons into the designated places. If you use 0.12 mm printing quality then they will fit in place with a bit of force and can not come off easily but in other cases you may use fixing glues to fix them in place. Each key has 4 pins inwhich they have to be used in an X format setup, means one has to use pins diagonally - as it is shown in the picture below.
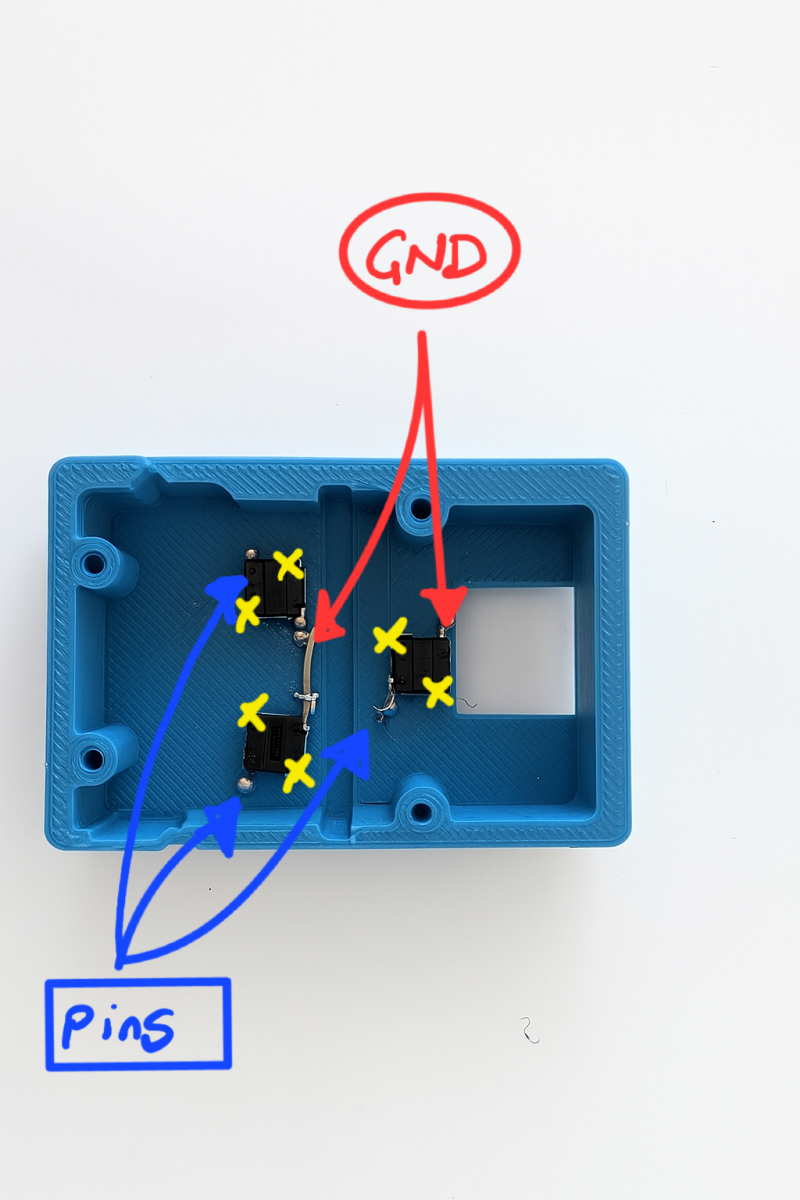
As it is visible in the picture, I connected two Ground (GND) pins on the micro keys to use less floating wires. All the pins shown by the blue arrows could be joined together and then must be connected to one of the GND pins on arduino board. As mentioned before we have to use the pins diagonally so we have to connect the corresponding pins to pins 2,3,4 pins on the arduino board. Then we are going to prepare the Potentiometer. Each potentiometer has 3 pins, two side ones and 1 center pin. Either side pins could be connected to GND or positive (VCC) pins on the Arduino board but the middle one must be connected to one of the A0-A3 pins on the board.

After this stage we have to get into the programming part. For this purpose I use Arduino IDE software you can download it for free from the official website. lets assume that we have connected all the negative pins to the same GND pin, Poitentiometer middle pin to the A3, each micro keys pin to 2,3, and 4th pins on the arduino board. In this case the code will be as follows.
/*
* Pro Micro USB Media Controller for Android
* - Potentiometer on A0 adjusts media volume (relative stepping)
* - D4 = Next Track
* - D5 = Previous Track
* - D6 = Play / Pause
*
* Requires: NicoHood HID-Project library
* Library Manager: "HID-Project by NicoHood"
* Board: "SparkFun Pro Micro" or "Arduino Leonardo"
*/
#include <HID-Project.h>
#include <HID-Settings.h>
constexpr uint8_t PIN_POT = A3;
constexpr uint8_t PIN_NEXT = 2;
constexpr uint8_t PIN_PREV = 3;
constexpr uint8_t PIN_PLAY = 4; // new Play/Pause button
// Tune these to taste
constexpr uint8_t VOLUME_STEPS = 16; // how many discrete positions (Android typically has ~15)
constexpr int POT_DEAD_BAND = 6; // ADC counts of hysteresis
constexpr uint16_t REPEAT_DELAY_MS = 12; // delay between repeated volume key events
constexpr uint16_t SCAN_MS = 5; // main loop interval
// ---------------------------------------------------------------------------
// Simple debouncer struct with constructor fix
// ---------------------------------------------------------------------------
struct Button {
uint8_t pin;
bool lastStable = true; // true = released (pullup)
bool lastReading = true;
uint32_t lastChangeMs = 0;
uint16_t debounceMs = 20;
Button() {} // default constructor
Button(uint8_t p) : pin(p) {} // added constructor for old compilers
};
Button btnNext(PIN_NEXT);
Button btnPrev(PIN_PREV);
Button btnPlay(PIN_PLAY);
// ---------------------------------------------------------------------------
int lastPotRaw = -1; // last raw ADC used for hysteresis
int lastVolumeSlot = -1; // last quantized slot
// ---------------------------------------------------------------------------
int quantizeVolume(int adc) {
adc = constrain(adc, 0, 1023);
long slot = (long)adc * VOLUME_STEPS / 1024;
if (slot < 0) slot = 0;
if (slot > VOLUME_STEPS - 1) slot = VOLUME_STEPS - 1;
return (int)slot;
}
void sendVolumeSteps(int diff) {
if (diff > 0) {
for (int i = 0; i < diff; i++) {
Consumer.write(MEDIA_VOLUME_UP);
delay(REPEAT_DELAY_MS);
}
} else if (diff < 0) {
for (int i = 0; i < -diff; i++) {
Consumer.write(MEDIA_VOLUME_DOWN);
delay(REPEAT_DELAY_MS);
}
}
}
bool updateButton(Button &b) {
bool reading = digitalRead(b.pin); // pullup: HIGH = released, LOW = pressed
uint32_t now = millis();
if (reading != b.lastReading) {
b.lastChangeMs = now;
b.lastReading = reading;
}
if ((now - b.lastChangeMs) > b.debounceMs) {
if (reading != b.lastStable) {
b.lastStable = reading;
// Return true only on the transition to pressed (LOW)
if (b.lastStable == LOW) {
return true;
}
}
}
return false;
}
void setup() {
pinMode(PIN_POT, INPUT);
pinMode(PIN_NEXT, INPUT_PULLUP);
pinMode(PIN_PREV, INPUT_PULLUP);
pinMode(PIN_PLAY, INPUT_PULLUP); // new play/pause button
Consumer.begin(); // start USB Consumer Control device
delay(200); // small settle
// Initialize with current pot position so we don't spam on boot
int adc = analogRead(PIN_POT);
lastPotRaw = adc;
lastVolumeSlot = quantizeVolume(adc);
}
void loop() {
// --- Potentiometer handling with hysteresis ---
int adc = analogRead(PIN_POT);
if (lastPotRaw < 0 || abs(adc - lastPotRaw) > POT_DEAD_BAND) {
int slot = quantizeVolume(adc);
if (lastVolumeSlot >= 0 && slot != lastVolumeSlot) {
int diff = slot - lastVolumeSlot;
sendVolumeSteps(diff);
}
lastVolumeSlot = slot;
lastPotRaw = adc;
}
// --- Buttons ---
if (updateButton(btnNext)) {
Consumer.write(MEDIA_NEXT);
}
if (updateButton(btnPrev)) {
Consumer.write(MEDIA_PREVIOUS);
}
if (updateButton(btnPlay)) {
Consumer.write(MEDIA_PLAY_PAUSE);
}
delay(SCAN_MS);
}
Now connect the Arduino by USB C cable to the PC and choose the board from the dropdown menu inside Arduino IDE software and hit the upload button, wait for some seconds and your media controller is ready to use. Usually you have to arrange the pin numbers in the code to match them to your desired function to each key.
Add comment
Comments